Should I port my application?
First, a few observations about the Eee PC from the perspective of a developer wondering whether his or her application would be a good match for it. What kind of users are we talking about? Well, it’s such a general-purpose machine it’s hard to narrow it down, but it obviously has appeal to children and women who generally have smallish hands and could more easily adapt to the diminutive keyboard. But at least for casual use, most people could get used to the form factor, and some tasks don’t need much keyboard use, such as browsing, listening to music or reading e-books.
There are plenty of reports of people using the Eee PC for substantial work – it’s good for journalists, photographers, students, and business travellers (although the limited battery life could be a problem on long trips). It could be useful for accountants visiting client premises, for example, or engineers often on the road. The Eee PC enthusiasts’ forums are full of examples of both business and home use. Unlike smaller devices such as the Nokia N series of internet tablets, or Windows Mobile devices, the usable keyboard means that this machine has the potential for running a fuller range of applications, albeit for shorter periods of time than on a larger computer (due to comfort and battery limitations). The high level of compatibility of files and applications between conventional PCs and the Eee PC increases the appeal of performing regular PC work on a highly mobile machine.
Apart from the small keyboard, the main limiting factor is probably not so much the slower processor as the low-resolution screen. However, people are getting used to it and one user has reported that they find a regular screen too big now, and they have to emulate the Eee PC resolution on their desktop!
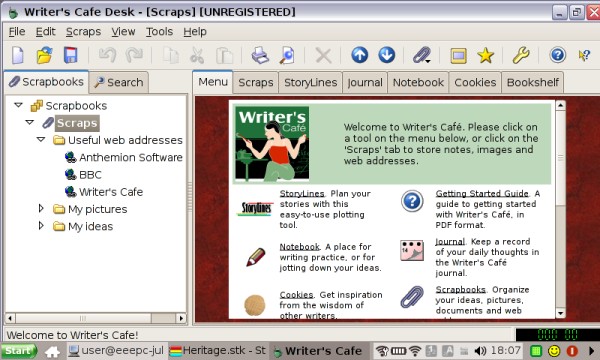
So, the answer to the question, “Is it worth porting my app to the Eee PC?” is probably going to be “Yes” in most cases. If you’re already writing wxGTK applications, it’s almost a no-brainer. Apart from anything else, there’s a “cool factor” in showing your applications running on the gadget.
Starting wxGTK development
If you are targetting the Eee PC running Linux, then you will use the wxGTK port (wxWidgets on top of GTK+ 2). As a bonus, your work in tailoring applications to the Eee PC display size will also pay off when recompiling your applications for Windows, to target Eee PC running the Microsoft operating system.
There are many combinations of working methods and tools for writing wxGTK applications. I do most of my development on a Windows PC, and compile the apps on Debian Edge running on the same machine (using VMware) for deployment on Linux. The resulting wxGTK application runs on most modern Linux distributions, which all tend to come with the necessary GTK+ 2 libraries regardless of desktop environment in use. The Eee PC’s Xandros is no exception. The .deb archive I distribute for use on standard GNOME and KDE Linux desktops is the same used for the Eee PC, and the applications dynamically adapt to the display in use. Obviously if you’re going to deliver on an Eee PC it helps to have one for testing purposes – although you can do a certain amount of testing by reducing the resolution, you still need to check the installation and performance on real hardware. Having said that, debugging wxGTK-specific issues can mostly be done within the comfort of a spacious Linux desktop using a distro such as Debian, Ubuntu or Xandros.
As for all wxGTK development, you need the GCC compiler (available preinstalled on most Linux distributions), and the GTK+ 2 development libraries (search for the gtk2.0-dev package). For decent printing support, don't forget to install the libgnomeprintui2.2-dev package also before configuring and compiling wxWidgets. Get the latest version of wxWidgets in the 2.8 series, for example wxGTK-2.8.7.tar.gz at the time of writing. You can use plain old Emacs and gdb to write and debug apps, but you may wish to consider IDEs such as Anjuta and Code::Blocks, and for generating code, dialog editors/RAD tools such as DialogBlocks and wxDesigner. Basically, anything that applies to wxGTK development also applies to Eee PC/Xandros development.
If you decide to use DialogBlocks, both to generate first-cut application skeletons and to help generate detailed dialogs, DialogBlocks will help you compile wxWidgets as well as your own app. Create a project (or try one of the samples), select the configuration you want to use, set the wxWidgets path, and DialogBlocks will first compile wxWidgets before compiling the project.
Adapting to the low resolution screen
The following is applicable to any device with a low resolution, so it’ll help you prepare for future Linux-based mobile devices too. It’s also applicable to other operating systems that wxWidgets supports, such as Windows and Mac OS X.
Your first step might be to add a full-screen mode. This is straightforward in wxWidgets, using the wxTopLevelWindow::ShowFullScreen function. The usual shortcut key for this is F11. From wxWidgets 2.8.7, menu accelerators on wxGTK are still active even if the menubar has been removed, so the user can press F11 to restore the window to normal viewing. ShowFullScreen can retain your toolbar, or hide it, depending on your application’s requiremements. If your main window still uses a lot of space for non-essential control windows (for example tabs and extra toolbars), then you might consider reparenting the editing window to a new frame and showing that full-screen, subsequently reparenting the window back when the user returns the window to normal.
Note that currently on wxGTK, the toolbar is restored when returning to normal view, even if the toolbar was previously hidden. You may need to add some extra logic to hide the toolbar explicitly.
Also note another quirk if you’re planning to show a frame full-screen when the program starts – the window may show in its initial size momentarily, then resize to fit the screen. You can mitigate this effect by making the initial window size very small, say wxSize(1, 1).
You may find you made assumptions about screen size when designing elements of your main screen. Palettes, tabs and toolbars can look rather huge and leave little space for editing, especially when even a maximised main window has to compete with a largish title bar at its top, and a taskbar at the bottom of the Eee PC desktop. Here are some ideas for further adaptations:
- Add an option for small toolbar icons if your toolbar currently has large ones. Also make it possible to switch toolbar labels off, and remove inessential tools for low-resolution displays.
- Add an option to hide the toolbar and status bar.
- Use wxAuiNotebook for a tabbed interface, and set the notebook font to a couple of sizes smaller than normal. Native GTK+ tabs can be rather large.
- Use wxWindow::SetWindowVariant to set a smaller font size for panels.
- Use a wxChoicebook instead of wxNotebook for a tabbed palette, to reduce the vertical size requirement.
- Maximise the main window by default on a small screen.
- Make sure there are accelerators for important operations, so that the program is still usable when full-screen and without a toolbar or menubar.
- Consider a vertical toolbar or other control window to the left or right of your main editing area, since vertical space is in shortest supply.
- Use a wxScrolledWindow for larger panels containing controls. You can just replace the wxPanel base class with wxScrolledWindow, and call SetScrollRate to enable the scrollbars.
I have a function I use to test for a small screen – HasSmallScreen – which I use to make UI choices as the windows are created. You can have a balance of customisable and non-customisable choices: you might want everything to be under user control, or you might not want to burden the user with so many choices. But the defaults should reflect the best choices for the display resolution.
Making your dialogs fit
Probably the area you’ll find in need of most work is your application’s dialogs. You may find that some or all of them they disappear off the edge of the screen, especially vertically. There are several techniques you can apply here. Firstly, you can set the initial size of individual controls (such as listboxes) to be smaller when a small display is detected. You can also use wxWindow::SetWindowVariant, and simply omit certain controls and explanations from the dialog. You can do this by creating all elements as usual, but hiding some of them before showing the dialog, for example:
GetSizer()->Show(m_description, false);
In DialogBlocks, you can make sure the control and its sizer parent both have member names, and then before the end of CreateControls() write something like:
m_innerSizer->Show(m_furtherInfo, false);
You may find that after these adjustments, and others including dividing up the dialog into pages, your dialogs will fit. If not, you can take more drastic action using scrolled windows.
To make an ordinary custom dialog scrollable, add a wxScrolledWindow under the top sizer, add a sizer to the scrolled window, and place the main controls under that sizer. Keep the OK and Cancel button row under the dialog’s main sizer so only the main content of the dialog scrolls, leaving the OK and Cancel buttons accessible at all times. Initially, don’t make the scrolled window scrollable. If you are using DialogBlocks, set PPU X and PPU Y to zero and ensure “Fit to content” is checked and also that the wxNO_BORDER and wxTAB_TRAVERSAL styles are checked. When you have done this, the dialog should behave exactly as before, when wxSizer::SetSizeHints is called and the dialog shown.
Now you need to check whether the dialog size is the same or more than the available desktop client size. wxSizer::Fit (called by wxSizer::SetSizeHints) attempts to restrict the dialog to the available space, so you need to assume that if one or both dimensions are the same as the desktop dimensions, the dialog was too big and has been resized. If the whole dialog couldn’t fit, you need to enable the scrolled window’s scrollbars and resize the dialog, taking into account the dialog titlebar which wxWidgets 2.8 doesn’t currently do itself.
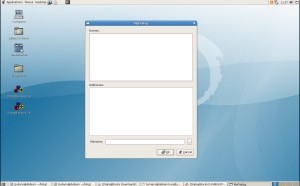
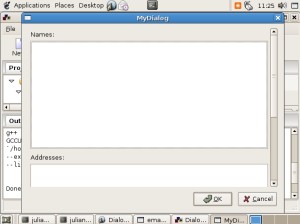
A simple example built with DialogBlocks is available as a zip file and as a tar.gz file from http://www.anthemion.co.uk/wx/largedialog.tar.gz or http://www.anthemion.co.uk/wx/largedialog.zip. You can use the demo version of DialogBlocks to build and run the sample, or you can adapt the makefile as you see fit, or you can simply copy and paste the relevant code for your own applications. The images below show the dialog first on a regular-sized Debian desktop (no scrollbar), and secondly on a 640x480 display (a vertical scrollbar appears).
What if you have a lot of dialogs, and don't want to spend time customizing them? No problem - just replace wxDialog with wxScrollingDialog, a class that rejigs an existing hierarchy to keep the standard buttons shown. You can download the class here.
Distributing your application
While it’s best to create a .deb archive, you could also distribute a tarball. For a shortcut to making Debian archives, see checkinstall. For creating a .deb from scratch, see for example here and here.
The .deb or your installation script should also install desktop files and MIME type files. These are standards documented by Freedesktop.org in particular the .desktop file standard. When you install your .desktop files and icons into the appropriate place, and specify the application category, the KDE or GNOME desktop environment will know where to put your application’s shortcut(s) on its menus. However, most people may be using the standard IceWM window manager – the old version in use on Xandros doesn’t follow Freedesktop.org standards and you will need to add the ability to enable the Start menu and add your application’s menu items. I do this with a script that’s included in my application files, so the user can run the script to complete the installation. It’s separate, in case the user isn’t running IceWM. The script creates local IceWM preferences and enables the Start menu; then it appends an entry to the menu file if it’s not already there. The user should reboot X with Ctrl+Alt+Backspace for the changes to take effect.
An example script is available here.
That’s all for now. Good luck with your Eee PC projects! I think the Eee PC and wxWidgets make a great combination, and it will be interesting to see how the market for desktop Linux will develop over the coming months.

